Video Box
I hope you are now somewhat comfortable in Aegisub. In this guide, we will move
to Video Box, the most important part of Aegisub for typesetting because this
contains some of the most used visual typesetting tools.
Once we learn about Video Box in this page, in the next few pages, we shall
learn about exciting tasks like position and orientation of text.
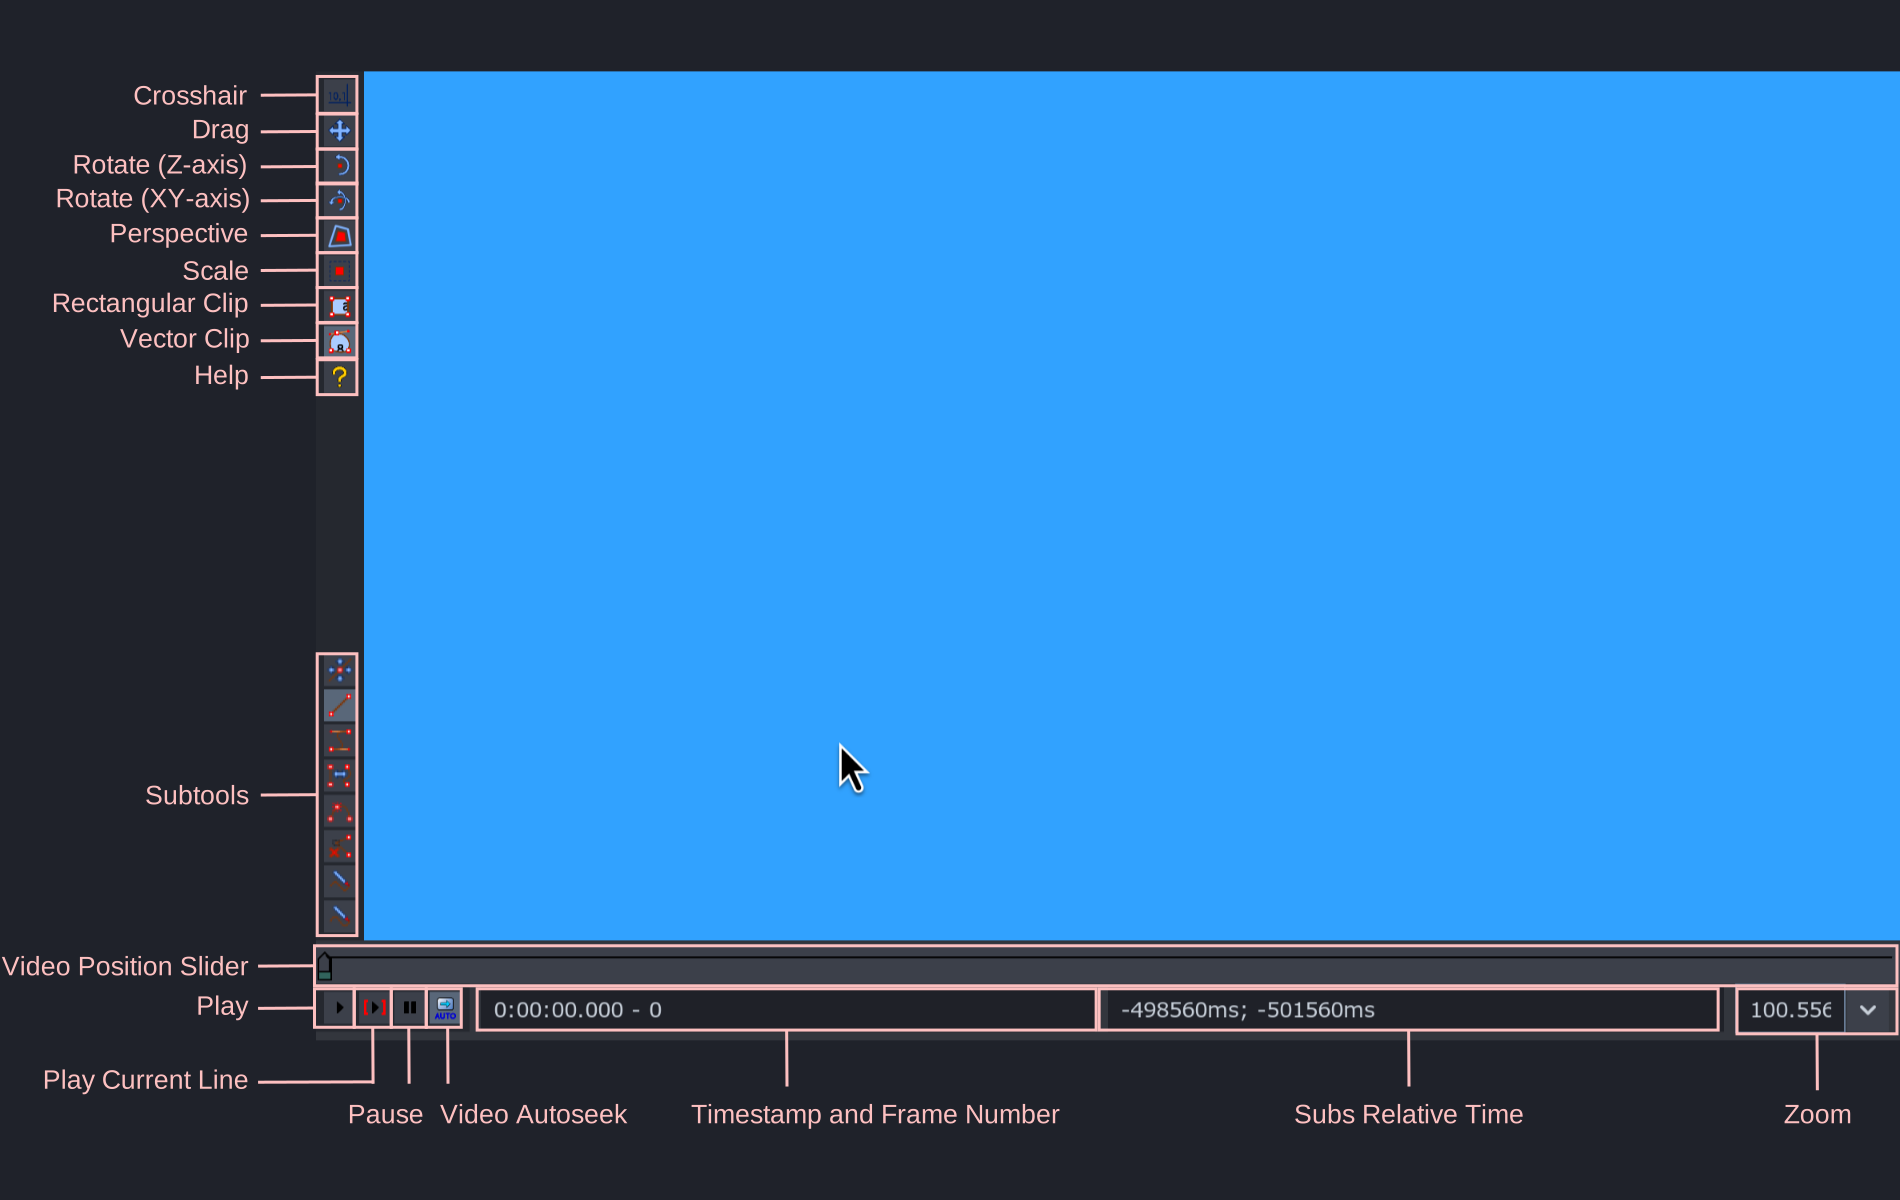
Parts of Video Box
We will discuss the visual tools such as crosshair, drag, rotate tools, perspective, scale, clip tools later in their specific page as they are what is used to change appearance of the text.
In this page, we will just talk about other elements of video box
| Item | Description |
|---|---|
| Subtools | When you choose any of the visual tool like clip, perspective etc, if they have tools that are associated with them, they appear in the subtools category. If a visual tool does not have any sub tool, this region is empty when that visual tool is activated. |
| Video Position Slider | This horizontal slider is used to seek the video. Holding Shift while dragging the slider snaps it to keyframe. |
| Play | Play the video starting at curently displayed frame. |
| Play Current Line | Play the video starting at the first frame of active line and stopping at the end of active line. |
| Pause | Pause the current video playback |
| Video autoseek | Toggles automatic seeking of the video to the first frame of a line whenever a new line is selected in subtitle grid. I recommend to keep this on |
| Timestamp and Frame number | Displays two numbers seperated by a dash(-). Displays the timestamp in the left and frame number in the right of dash for the currently displayed frame of video. |
| Subs Relative Time | Displays the time in milliseconds relative to the start and end of the active line. This is super important and will come handy later |
| Zoom | A dropdown menu that allows you to select the zoom level of the video |
Default Shortcuts for Video Box
| Hotkey | Description |
|---|---|
| Right | Seek to the next frame |
| Ctrl+Right | Seek to the end frame of active line |
| Shift+Right | Seek to the next keyframe |
| Left | Seek to the previous frame |
| Ctrl+Left | Seek to the start frame of active line |
| Shift+Left | Seek to the previous keyframe |
| Ctrl+1 | Jump to the start frame of active line |
| Ctrl+2 | Jump to the end frame of active line |
| Ctrl+3 | Set start of selected subtitles to current frame |
| Ctrl+4 | Set end of selected subtitles to current frame |
| Ctrl+5 | Set start and end of selected subtitles to keyframe around current frame |
| Ctrl+p | Play/Pause the video starting from currently displayed frame |
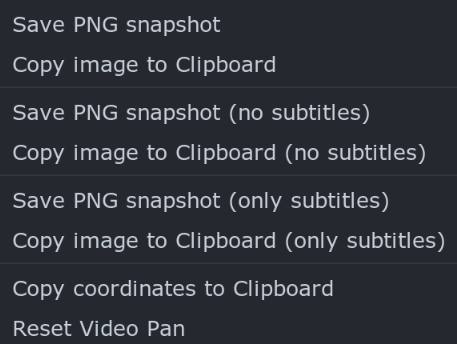
Video Box Context Menu
| Item | Description |
|---|---|
| Save PNG snapshot | - Saves an image of the current frame. - Image is saved to the path specified in the options. - The image will be in the real video size, and won't be affected by zooming or aspect ratio overriding. |
| Copy image to clipboard | - Same as above, but copies the frame to the clipboard, instead of saving as a PNG. - You can then paste it in any image editing software or chat. |
| Save PNG snapshot (no subtitles) | Saves an image of the current frame as PNG but subtitles won’t be visible in the image. |
| Copy image to clipboard (no subtitles) | Saves an image of the current frame without subtitles but copies it to clipboard. |
| Save PNG snapshot (only subtitles) | - Saves an image of the subtitles only in current frame - The image will be in the real video size and the position of subtitles is preserved |
| Copy image to clipboard (only subtitles) | Same as above but copies it to clipboard |
| Copy coordinates to clipboard | Copies the current mouse coordinates to clipboard, e.g. “230,152” |
| Reset Video Pan | If the video has been zoomed and panned (see below), reset the zoom and pan |
Zoom and Pan
Zoom and pan are extremely useful for typesetting. Zoom simply makes the video box bigger or smaller. This in turn makes video bigger and smaller as well. However, there are cases when simply zooming this way is not enough. Video panning refers to zooming in or out the video while keeping the size video box same. Panning as the name suggest also allows us to pan across the video surface.
| Hotkey | Description |
|---|---|
| Ctrl+Num + | Zoom video in by increasing video box size |
| Ctrl+Num - | Zoom video out by decreasing video box size |
| Scroll Up | Zoom video in by increasing video box size |
| Scroll Down | Zoom video out by decreasing video box size |
| Ctrl+Scroll Up | Zoom video in without changing video box size |
| Ctrl+Scroll Down | Zoom video out without changing video box size |
| Middle Click+Drag | Pan the video in the direction of mouse drag |
Zoom
Pan
Understanding Subs Relative Time

I've seen many people not understand this section of video box and it is very important that they do since this becomes useful later on. You can see there are two numbers separated by semi-colon.
The number left of semi-colon represents the time in milliseconds from the start
frame of current line to the current frame i.e +63ms in image above means current
frame is 63 milliseconds behind the start frame of the line. Similarly, -3357ms
means current frame is 33357 milliseconds before from the last frame of the line.
Note here that + represents time ahead and - represents time behind. Therefore
it is possible to go before the start frame and after the last frame of the line.

Here, both numbers are negative. It means current frame is before the start time of the line. i.e. current frame is 95 milliseconds before that start frame of line.

Conversely, in the image above, both the numbers are positive. It means current frame is after the end time of the line i.e. current frame is 413 milliseconds after the end frame of line.
I hope this much example is enough to demonstrate what subs relative time are. This will become useful later on.
Timing a sign
In order to typeset a sign, you need to time it first. Unlike dialogue timing,
sign timing has to be frame perfect. This is why we don't time it using Audio
Box. We time it using Video Box.
Nowadays, most of the signs already come roughly timed. If it is not, you can roughly time it yourself.
Then you go frame by frame by hitting arrow keys (Right for going forward and Left for going backward) until you reach the frame where the sign starts or ends. Then you hit Ctrl+3 to set the start time of the line in current frame or Ctrl+4 to set the end time of the line in current frame.
Binding Hotkeys
It's a bit weird to learn about binding hotkeys in a page about Video Box but
we need to learn it somewhere anyway. Hotkeys are useful because you can run
some command with a press of a button.
- In Aegisub, go to
View -> Options -> Interface -> Hotkeys. - Click on
Subtitle GridorEdit BoxorVideodepending on where you want to set the hotkey in. For now, pressVideo - Click on the button
Newat the top. - Then, in the
Hotkeycolumn i.e. the left column, click the key in the keyboard that you want to bind the script to. For example, press Esc key. - Then in the
Commandcolumn i.e. the middle column, type the command you want to run. Typevideo/pan_resetas the command. - Click
OKkey. - Now whenever you press the key in Esc key in the left column, the video panning you had will be reset.
So as long as you know the command, you can bind any action to a hotkey. As soon as you start typing, Aegisub will show all the available commands so that helps.