Motion Tracking Using Blender
Blender is a free and open source 3D graphics program and among the many things Blender can do, motion tracking is one of them. Blender is a point tracker which means that it only tracks a single point in a video relative to its surrounding. In contrast, Mocha Pro, another program used for motion tracking, is a planar tracker. Blender and Mocha Pro thus being different in how they track motion will perform variably in different situations. One may track a scene much better while the other fails.
Installation
Before we begin, make sure that you have Blender installed from its website if you are on Windows and your package manager elsewhere.
Installation of Blender Plugin
- Go to Akatsumekua's Blender Plugin github repository.
- Select the plugin for your operating system in the repository's README and download it.
- In Blender, go to
Edit -> Preferencesand click onAddons. - In the top right, click on the down arrow and select
Install from Disk - A file picker will open. Navigate to the file you just downloaded, select it
and click on
Install from Diskbutton. - The
Addonswindow will now showAAE Exportwith the checkbox ticked before its name. This shows that plugin is now installed and activated.
TODO: Add Video
Tracking in Blender
Opening Movie Clip Editor
When you open Blender, you will see the default 3D viewport. All of our motion
tracking will be done in another viewport called Movie Clip Editor. There are
two methods to get to this view. First, click in the icon below File`` in the top
left and click onMovie Clip Editor`.
TODO: Add Video
The second method is to use a keyboard shortcut. As soon as you open Blender, press
Shift+F2 in your keyboard to directly go to the Movie Clip Editor view at once.
Open video or image sequence
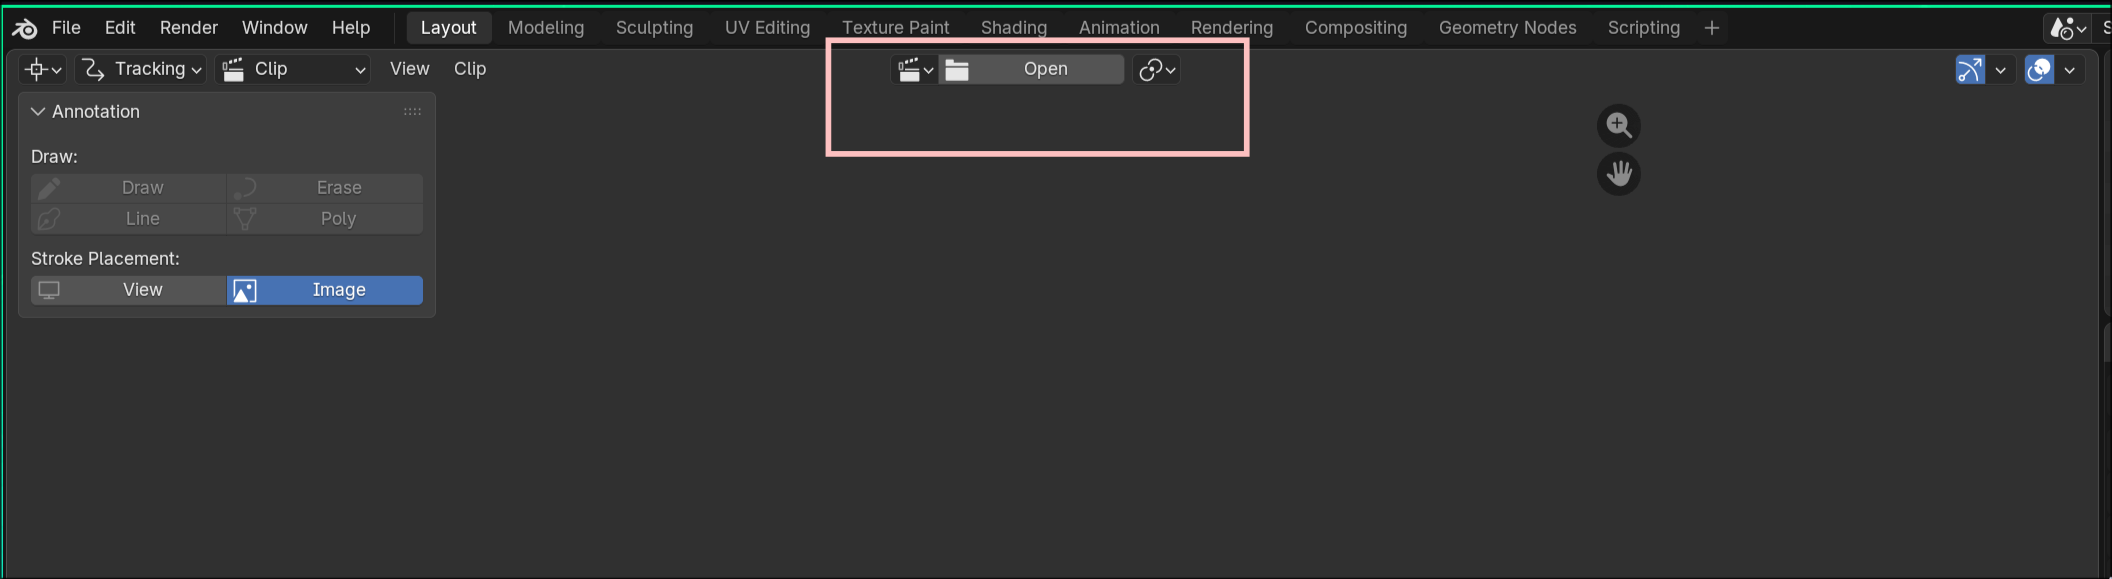
In order to load your video (made by x264) or image sequence (made by ffmpeg),
click on Open in the top middle portion of the window. Then navigate to
the folder where you have your video or image sequence. Select the file
and click Open Clip.
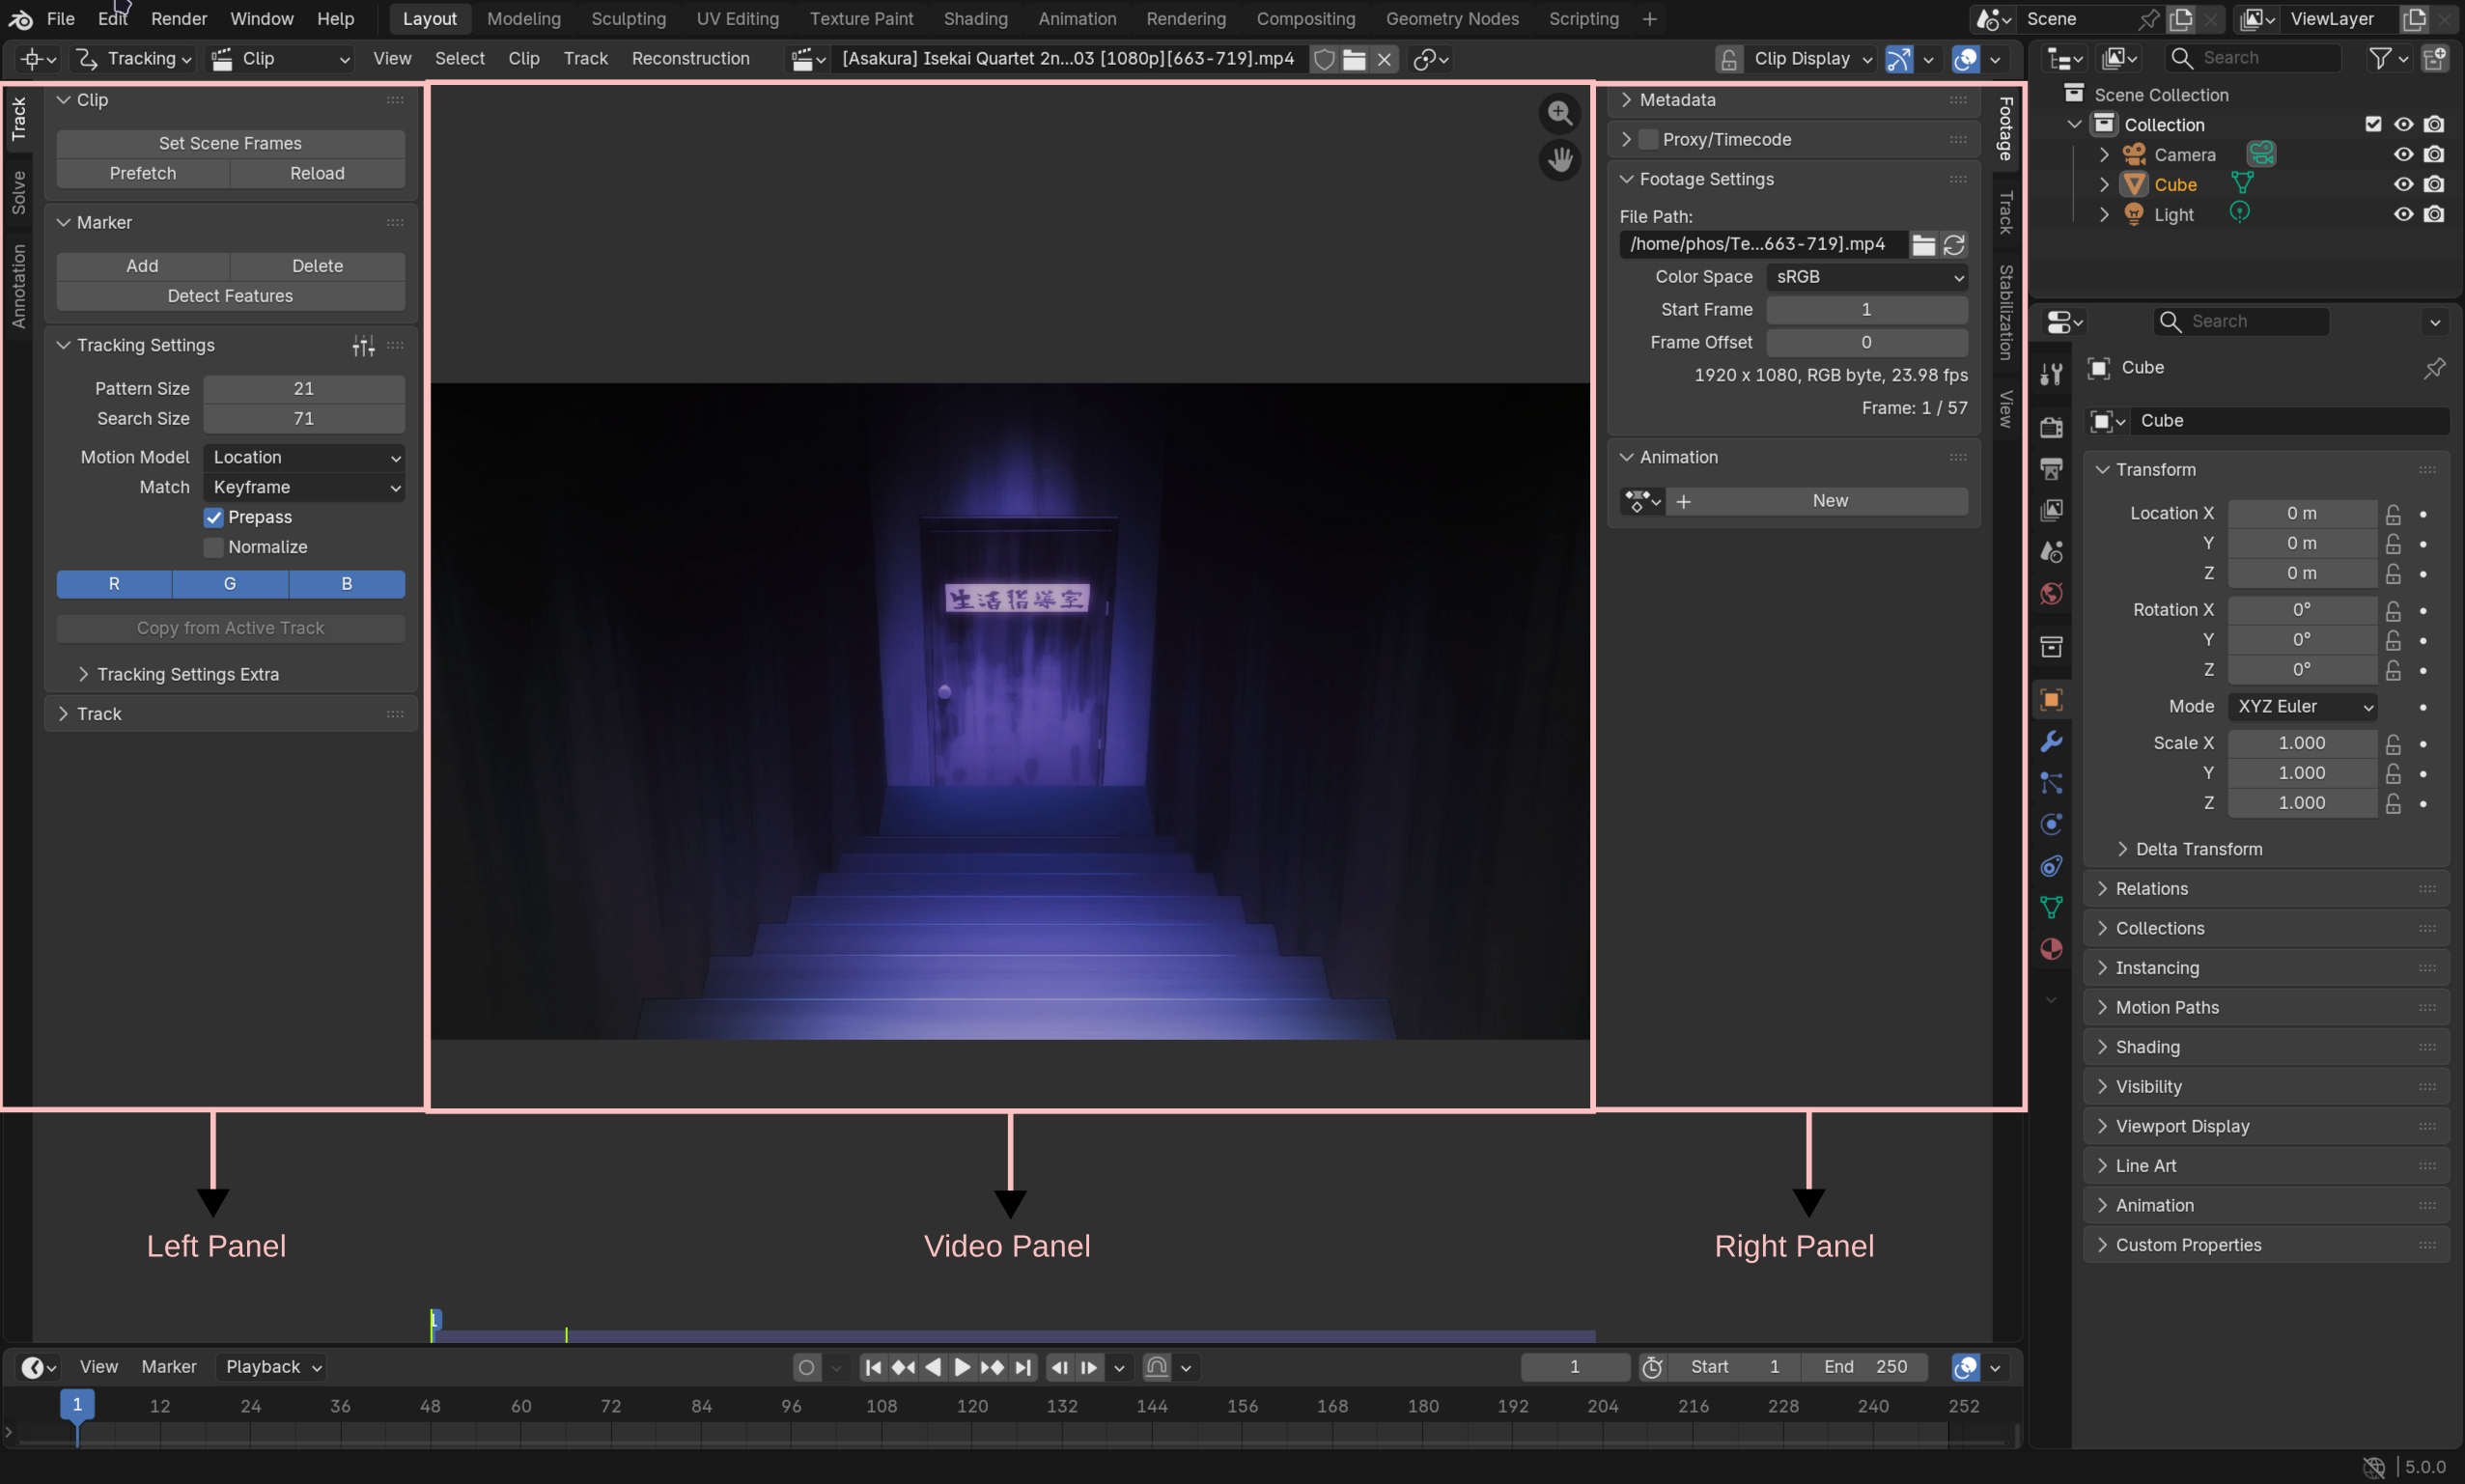
When you open the video, you will notice that there is left panel, video panel
and right panel. The left panel, video panel and the right panel. The left panel
has three tabs: Track, Solve and Annotation. Track panel is selected by
default.
As soon as you open a clip, you should make a habit of always doing two things.
First click on Set Scene Frames to ensure your start frame and end frame for
tracking is the same as that of your clip. Second, click on Prefetch to cache
your clip into memory for faster playback and tracking. Both of them are in the
left panel.
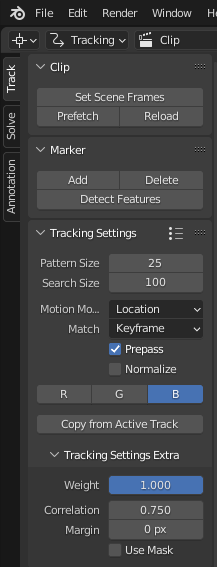
Tracking Settings
The left panel has a menu called Tracking Settings
where you can change settings that will affect your tracking.
| Item | Desciption |
|---|---|
| Pattern Size | Size of your pattern area. Pattern area is the region of the video that Blender uses as a reference for tracking. |
| Search Size | Size of your search area. Search area is the region around the pattern area where Blender searches to find the marker in the next or previous frame. |
| Motion Model | Defines what type of motion the sign has. Explained in more detail below. |
| Match | Defines the video frame that blender will reference for tracking. Explained in more detail below. |
| Normalize | Ticking Normalize will make blender not lose sight of the marker during slight light changes in the video. Use when there is light changes like light flashes in a sign. |
| RGB | This can be used if there is a specific color channel that you want to track or avoid tracking For example, if the sign is in the green background, then you don't want to track green background. So all you have to do is disable G button here to stop blender from tracking green channel. |
| Correlation | Inside the Tracking Settings Extra, you will find correlation.By default, it is 0.75 which means blender will consider the tracking successful if it is 75% sure that the marker has been properly tracked. I personally set this to 0.9 and only reduce it when necessary. |
Motion Model
This defines what type of motion the sign has. Properly setting this will be the key to a good motion track.
| Model | Meaning |
|---|---|
| Location | If the sign only has horizontal or vertical movement |
| Location & Rotation | If the sign has movement as well as rotation |
| Location & Scale | If the sign has movement as well as change in scale. |
| Location, Rotation & Scale | If the sign has movement, rotation and change in scale |
| Affine | If the sign has all movement, rotation and scale as well as stretch and skew |
| Perspective | If the sign has change in perspective |
Let’s say that the sign only has horizontal and vertical movement. You might think, I’ll use Affine since it is designed to track movement among other things. Not only is this more computationally expensive, this might even introduce more error in terms of scale or rotation when there wasn’t any in the sign. So choosing one carefully is important.
Match
This defines the frame that blender will reference for tracking.
| Match | Meaning |
|---|---|
| Keyframe | The frame in which you added the marker will remain the frame of reference |
| Previous Keyframe | The frame of reference is always updated to the last frame blender tracked |
Previous frame is useful when the frame of reference changes due to skew or stretch however it must be used with caution as it can lead to bad track sometimes. If there is an error while tracking a frame, this error will now become the new frame of reference and thus the error will compound with each new mistake in tracking.
Adding a marker
A marker marks the location in the video to track. To add a marker at a target, press Ctrl in your keyboard and left click anywhere in the clip to place a marker in that location.
A rectangle must have appeared at that point. That rectangle is called pattern area which is the region of the clip that Blender uses as a reference for tracking.
There is a hidden box around the selected marker that can be activated by pressing Alt+s in your keyboard. A new box bigger than the pattern area will appear. This is called search area. You can make it bigger to search bigger area at expense of some performance if the target moves large distance each frame.
You can move the marker to another location by pressing g and dragging it to new location. You can increase or decrease the size of the marker by pressing s and using mouse to scale. You can also left-click on each corner of the marker to change them individually. You can similarly rotate the marker by pressing r.
TODO: Add video
Note
Unless you are doing plane tracking in blender (plane tracking is explained below), you must only use one marker because each marker will result in new tracking data and we only need one.
It is paramount to understand that when you add a marker, it inherits all the tracking settings you choose. Once you add a marker, you cannot change the tracking settings again to make changes to the marker. I suggest that you remove that marker, change the tracking settings and add a new marker. However, if you must change the settings of a marker that has already been added, you must use the Track settings in the right panel. In this panel you’ll find the same settings you found in the left Track panel, but this one will modify the setting for currently selected marker. Additionally, the Track panel in the right also has the picture of the target with a small cross-hair that can be used to fine tune the position of the marker.
Tracking
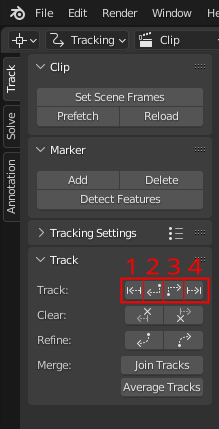
After you set the tracking settings and add a marker, you can now begin tracking. You can start from any frame but if you start tracking from a middle frame, you will have to track both backwards and forwards from that frame. Normally it is easier to start in the first frame or the last frame if the target is clearly visible in that frame. The keyboard shortcut to go to the first frame and the last frame is Shift+Left and Shift+Right respectively. You can start tracking either by clicking on buttons or by using keyboard shortcuts.
| Action | Button number as shown in image | Keyboard Shortcuts |
|---|---|---|
| Track forward 1 frame | 4 | Alt+Right |
| Track all frames forward | 3 | Ctrl+t |
| Track backward 1 frame | 1 | Alt+Left |
| Track backward all frames | 2 | Shift+Ctrl+t |
If at any point, the tracking fails, blender will stop immediately. In that case, you will have to try with a new tracker preferably in a different location or different tracking settings.
Warning
If you have seen tutorials of blender tracking somewhere else, you might have been told that changing size of the marker mid-tracking is not a problem. That is true when you are motion tracking for blender but for fansubbing purposes, you cannot change the size of the pattern area mid-tracking as that will lead to change in size of resultant tracking data. You can however change the search area at any point without any problem.
Exporting the tracking data
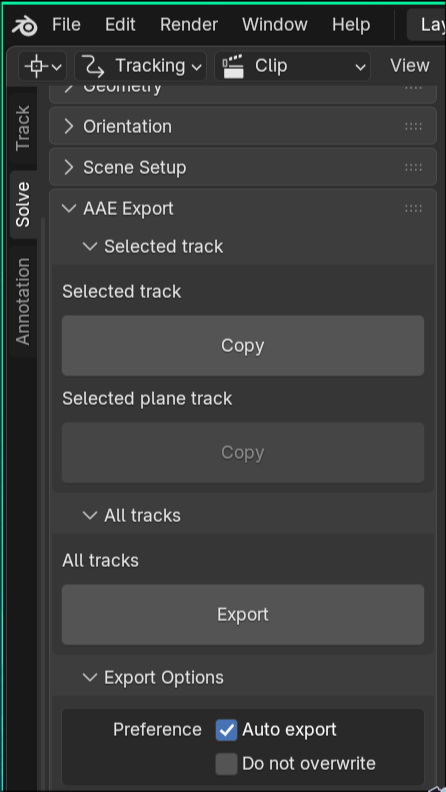
- After you successfully track all the frames, go to
Solvetab in the left panel. Scroll down to theAAE Exportsection. - You will find two
Copybuttons. If you have selected a marker, theCopybutton underSelected trackwill be active while the otherCopybutton will be inactive and greyed out. - Clicking on the active
Copybutton will copy the tracking data from the selected marker to clipboard. - If
Auto Exportis turned on in theExport Options, then the button will also export the tracking data to a file in the folder where clip you loaded is present in.
Example
Example 1: Simple translation
The sign simply moves up. You might think since the sign has slight perspective, I'll use perspective tracking but since the perspective of the sign does not change throughout its duration, we can use simple tracking.
Example 2: Zoom
A pretty simple example with just zoom.
Plane Tracking
Whenever your footage has a planar feature like a wall, floor, billboard etc. you can track the motion as well as the perspective of such flat surfaces using blender.
Open video or image sequence
Planar Tracking is also done in Movie Clip Editor so import your footage in the
same way you did for non-planar tracking.
Add Tracking Markers
To begin planar tracking in Blender, you first need to identify a flat planar surface in your footage that you want to track. Adjust the tracking settings as needed, then add multiple markers within that surface. In order to perform planar tracking, you'll need at least four markers that are successfully tracked.
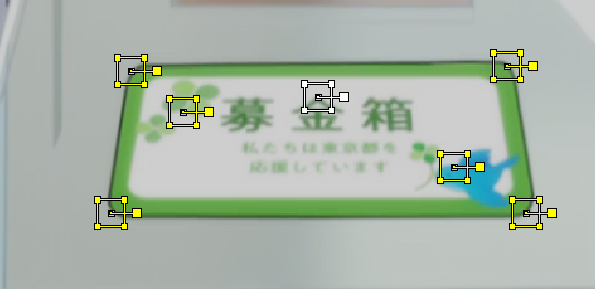
Once you've added four or more markers within the flat surface of your video, you can select all of the markers at once by pressing the a key on your keyboard, and then track them all simultaneously. Keep in mind that you may need to re-track markers if at least four of them were not successfully tracked during the initial pass.
TODO: Explain Detect Features with Annotation
Creating the Plane
- When you are satisfied with tracking, you can select all markers by pressing a or manually select four or more successfully tracked markers.
- Click on
Solvetab in the left panel and then click onCreate Plane Track.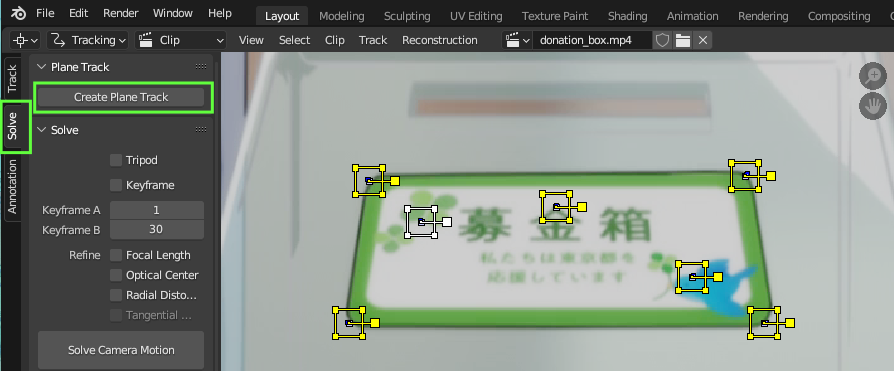
- This will generate a rectangular box on the screen, which represents the plane
that Blender has created using the tracking data from all the markers you selected.
When you play the video, you'll notice that the plane track moves along with
the flat surface you tracked, accurately reproducing its motion and perspective
in three-dimensional space.
Adjusting the Plane
Note
If perspective is applied in the Aegisub itself using the perspecitve tool, this step of adjusting the plane in blender can be skipped. In fact, this is recommended if accuracy in perspective is higher priority.
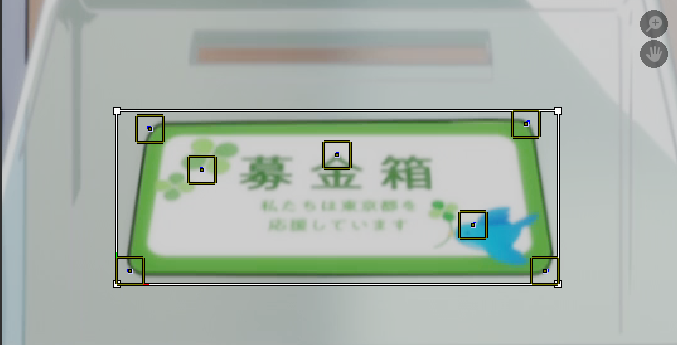
Once you've created a plane track in Blender, the next step is to adjust the perspective of the plane so that it matches the flat surface you tracked. If the surface you tracked has no perspective distortion, you can skip this step.
To adjust the plane's perspective, click and drag each corner of the plane individually, making sure that the plane matches the shape and angle of the flat surface you tracked. When you've properly adjusted the plane, it should align perfectly with the surface, sticking to it as if it were the border of that surface.
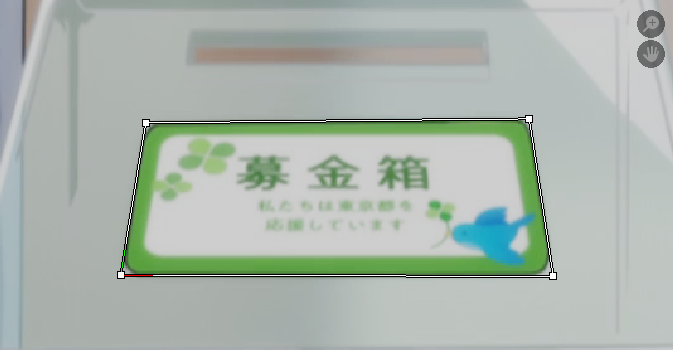
While adjusting the plane track in Blender, you may find that the markers used to create the track get in the way. To temporarily hide the markers, simply select the plane track and press Shift+h. This will hide all the markers, making it easier to see the plane and adjust its perspective. If you want to bring the hidden markers back into view, press Alt+H.
Fixing error in tracking
If you notice that the plane track doesn't stick closely enough to the surface you're tracking, you may need to make some fine adjustments to correct any errors. To do this, you can use Blender's keyframe feature to lock in changes to the plane track on specific frames.
- First, locate the frame where the plane is no longer conforming to the surface as closely as you'd like. In the left panel of the Motion Tracking workspace, click on the "Track" tab. Then click on "Plane Track" to select it.
-
Next, click on the small box with a dot next to "Auto Keyframe". This will tell Blender to treat any changes you make to the plane in this frame as new keyframes, allowing you to fine-tune the tracking as needed.
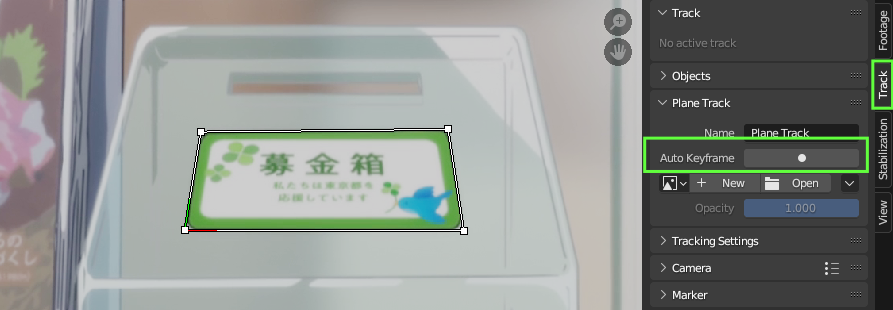
-
Finally, make the necessary adjustments to the plane track by dragging its corners until it conforms more closely to the surface. As you make these changes, Blender will readjust the plane so that it conforms surface accurately around the current frame.
Exporting
You will export the tracking data in the same way you did for normal tracking but
while keeping the plane selected. Once you export, the power-pin data should be
in your clipboard. Use it in Aegisub-Perspective-Motion script like we learned
in the Motion Tracking page.
Plane Tracking Example
TODO
Offset Tracking
When you are tracking a marker in Blender, there may be situations where the object you are trying to track is no longer visible on the screen, either because it is blocked by an obstruction or it moves out of the frame. In such cases, you have two options: you can either choose a different location to track that is not obstructed or you can use offset tracking.
The fundamental idea behind offset tracking is that if the object you are tracking is not visible anymore, you can track a different location and apply the tracking data to the original marker.
As offset tracking involves assigning tracking data of a different location to the original marker, the resulting tracking data may not be as accurate as actual tracking. Therefore, it is recommended to use this method with caution and only when necessary.
- Place a marker in your target and track as much as you can.
- When the target is no longer visible, return to the last accurately tracked frame and press gg to move the marker to a new location that is visible and trackable. It is important to choose a position as close to the original marker as possible and with similar motion, particularly during rotations or skewing, as different parts of the video may move at different speeds.
- Continue tracking the new position.
- In case the new position also gets obstructed, press gg again and move the marker to a new position and track again.
- If at any point the original target becomes visible again, to reset the marker to its original position, you can follow these steps. First, click on the Track tab located in the right panel. Next, click on Marker drop-down and locate the Offset parameter. You will see two values, "X" and "Y". Set both of these parameters to zero. By doing this, the marker will be returned to its original position and continue to be tracked from that point onwards.
Offset Tracking Example
Let's take this sign
The text in the board pans across with portions of text going off-screen and coming back letter. When you place a marker in a place, that marker will not be visible in the screen for the whole duration of track. These kind of signs require offset tracking.
Smoothing
Blender, being a point tracker, relies on the tracking data of multiple points to track an object. However, for the purpose of fansubbing, we can only use one tracking point. This will understandably lead to imperfect tracking. These imperfections will cause a lot of jitter in tracking data. Therefore, we may need to smooth out the tracking data using Akatsumekua's blender plugin in some cases.
Activating Smoothing Panel
- In Blender, go to
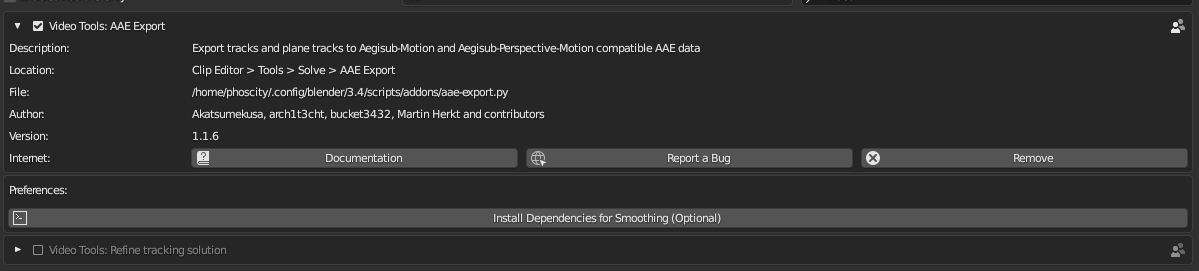
Edit -> Preferencesand click on Addons. - In the search bar, type aae and AAE Export should appear. Click on Install dependencies for Smoothing (Optional). This should install all the required dependencies.
- In a system like Arch Linux where pip cannot install dependencies, you can install them manually. The dependencies are numpy, scikit-learn, matplotlib and Pillow.
Perform Smoothing
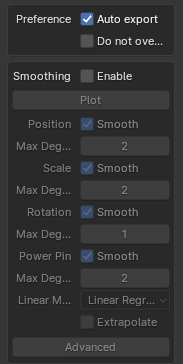
- Tick on Enable beside Smoothing.
- Similar to how we chose position, scale and rotation while tracking, we can also enable or disable position, scale and rotation with an addition of power-pin for smoothing. (For regular track, position and power_pin is directly copied from the centre and the corners of the marker, after which scale and rotation is calculated from power_pin. For plane track, only power_pin is directly copied from the four corners of the plane track, while position, scale and rotation is calculated from power_pin.)
- In the input box, user can input degree. The plugin smooths out the tracking data using the input degree. The task of smoothing is to keep on increasing the degree which will be used to fit the tracking data to regression models to produce smoothed tracking data.
- It is extremely easy to increase the degree to much to overfit the data so each increment must be checked.
- If smoothing is enabled and Copy button is clicked, the smoothed data will be copied to the clipboard.