Edit Box
If you have followed this guide in sequence, you now know which part of Aegisub
is an Edit Box. You have even used it to make your first subtitle but you just
made a boring text. We've done too much reading. In this page of guide, let us
actually change the appearance of the text using Edit Box so that we start
feeling like a typesetter.
Parts of Edit Box
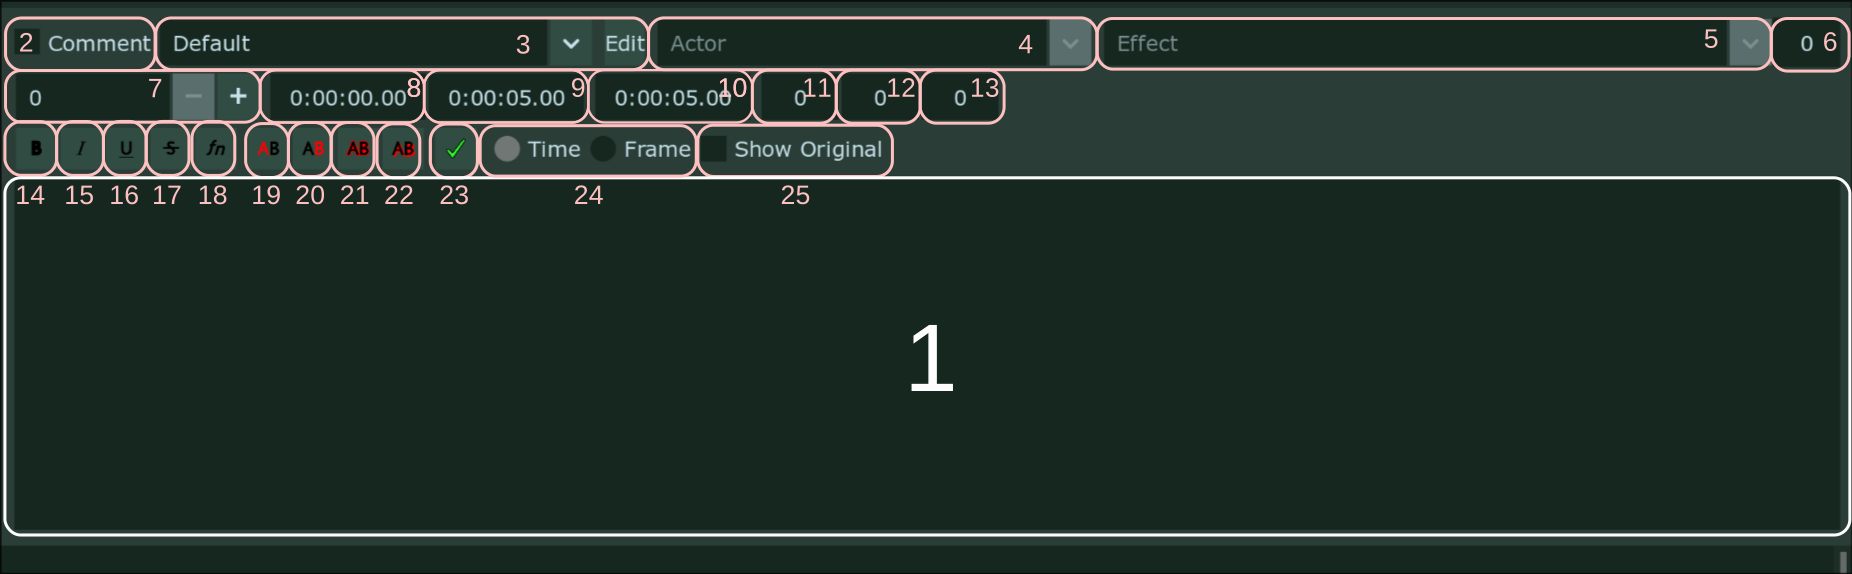
Warning
If you are using Windows, it will look slightly different but I'm sure you will figure it out.
| Number | Description |
|---|---|
| 1 | This is the box where the actual text is written. This is like a notepad where you can freely type the line. |
| 2 | Flags the line as comment. Comment lines will not be displayed in the video |
| 3 | Dropdown menu where you can select a style for active line. Styles will be explained later in the guide |
| 4 | Actor menu has no effect on subtitle display. You can put any text here you like. Or not. |
| 5 | While there are pre-defined effect that will effect subtitle display, they are all useless. Treat it just like Actor field |
| 6 | The total number of characters on the active line |
| 7 | Layer for the line Layers will be explained later in this guide |
| 8 | Start time / frame for this line |
| 9 | End time / frame for this line |
| 10 | Duration / Number of frames for this line |
| 11 | Left Margin for this line. 0 means margin from style is used. |
| 12 | Right Margin for this line. 0 means margin from style is used. |
| 13 | Vertical Margin for this line. 0 means margin from style is used. |
| 14 | Inserts a bold override tag (\b1) at the cursor position. If the text is already bold, inserts a corresponding closing tag (\b0). |
| 15 | Inserts an italics override tag (\i1) at the cursor position. If the text is already italic, inserts a corresponding closing tag (\i0). |
| 16 | Inserts an underline override tag (\u1) at the cursor position. If the text is already italic, inserts a corresponding closing tag (\u0). |
| 17 | Inserts an strikeout override tag (\s1) at the cursor position. If the text is already italic, inserts a corresponding closing tag (\s0). |
| 18 | Brings up a font selection window and inserts a font face name tag (\fnFontName) with the given font name. |
| 19 | Brings up the color picker and lets you choose a color; then inserts a primary color override tag (\c) with the chosen color at the cursor position. |
| 20 | Brings up the color picker and lets you choose a color; then inserts a secondary color override tag (\2c) with the chosen color at the cursor position. |
| 21 | Brings up the color picker and lets you choose a color; then inserts an outline color override tag (\3c) with the chosen color at the cursor position. |
| 22 | Brings up the color picker and lets you choose a color; then inserts a shadow color override tag (\4c) with the chosen color at the cursor position. |
| 23 | Move to the next line, creating a new one at the end of the file if needed. |
| 24 | Changes display between times and frames in 8, 9 and 10 number as shown in image |
Default Shortcuts of Edit Box
| Hotkey | Description |
|---|---|
| Alt+1 | Open color picker for primary color to be inserted at cursor |
| Alt+2 | Open color picker for secondary color to be inserted at cursor |
| Alt+3 | Open color picker for outline color to be inserted at cursor |
| Alt+4 | Open color picker for shadow color to be inserted at cursor |
| Enter | Move to the next subtitle line, creating a new one if needed |
| Shift+Enter | Insert hard line break in the cursor |
| Ctrl+Del | Delete current line |
| Ctrl+Shift+V | Paste subtitles over current line |
Inserting ibus Tags
ibus tags simply refers to italics, bold, underline and strikeout tags. They
are the simplest formatting you can give to a text.
- In the edit box, select the text you want to apply formatting to.
- Click on the button that does that formatting you want. In the image above,
14for bold,15for italics,16for underline and17for strikeout. - Aegisub will add the start tag before the selection and end tag after the selection.
Changing Fonts
- In the edit box, place the cursor at a point in the text. We will be inserting font tag at the cursor and all the text after it will have that font.
- Click on the
Fontbutton i.e.18in image above. - A dialog will appear with a list of fonts. Select one of them and click
OK
Changing Colors
- In the edit box, place the cursor at a point in the text. We will be inserting color tags at the cursor and all the text after it will have that color.
- Click on the color button i.e.
19for primary color,21for border color and22for shadow color in image above. - Color picker will appear. Select the color and click
OK
Color Picker
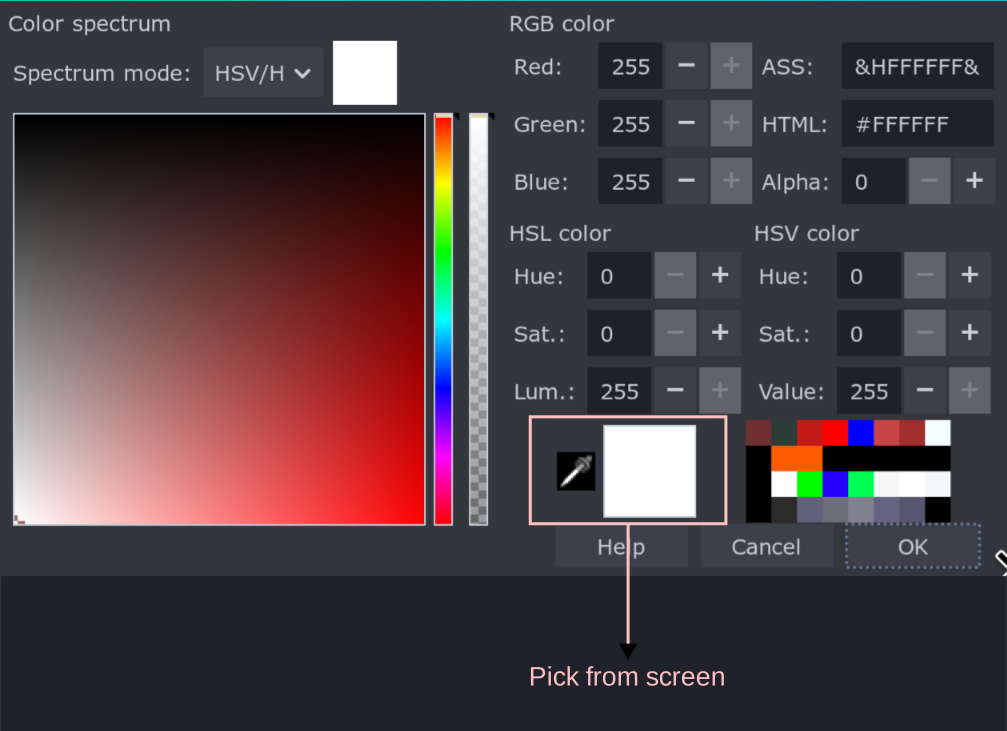
As you can see in the image above, there are a lot of elements in the color
picker but let us focus on one thing only: Pick from screen.
You can see a dropper icon and a color square in this section. Click on dropper
icon and hover over the video. You will see that the color in the square is the
same as the part you hovered upon. If you click on any part of the video,
that color will be picked. You can refine the color by clicking over the color square
and if you click OK, that color will be added.
Warning
If you are using Linux, color picker will not work. If you are on X11, go to
View -> Options -> Interface. Enable Resctrict Color Picker to Window
and click on OK button. If you are on Wayland, you are out of luck. Use a
software that picks colors from screen. I personally use hyprpicker.
Switching between Timestamp and Frames
You can switch between timestamp and frame to represent the start time, end time and duration of the video. The advantage of being able to do this might not be obvious right now but this is good to keep in the back of the mind.
Just know that you will most likely not be changing the time of the line by changing time here most of the time.
Commenting Lines
Commented lines are those lines that are not rendered in the video. You can comment lines to hide them.
Edit Box Context Menu
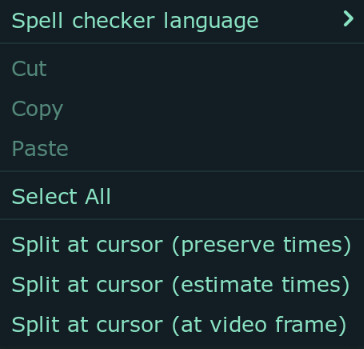
If you right-click anywhere in the edit box, you get the following menu:
| Item | Description |
|---|---|
| Spell checker language | You can set which language it will use for checking from this menu |
| Select All | Select the full text in the edit box |
| Split at cursor (preserve times) | Split the line into two new lines at cursor position while keeping the old line's timing for both lines. |
| Split at cursor (estimate times) | Same as above but tries to guess whee the split is based on the length of the text on each side of the cursor. |
| Split at cursor (at video frame) | Same as above but makes the first line end on the previous video frame and second line starts on the current frame. |
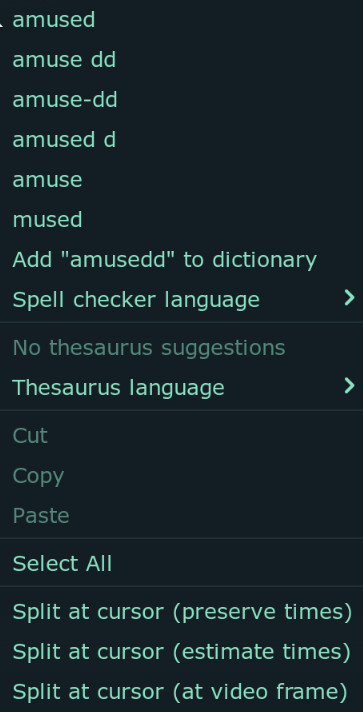
If there is a word that is misspelled, it will have a red squiggly underline in the edit box. If you right-click in that word, you will see all the alternative suggestions.
You can click on Add <misspelled word> to dictionary to treat the word as
correct spelling.